PaperCut is a system implemented by ITS for student printing.
Faculty & Staff can configure network printers.
Student Printing (PaperCut)
Students are alloted $15 in PrintBucks each semester & are charged 3 cents for black & white pages and 50 cents for color pages. If you use up your PrintBucks during the semester, you will be charged to your Eagle Bucks account. Note: Two pages, printed double-sided, are charged as one page.
Print to the libraries & other public printers on campus using the PaperCut print queues:
- bc-print-bw
- bc-print-color
- bc-print-graphicsbw - Large or complex files (Google Slides, PowerPoint, complex PDFs, etc.) should be sent to the bc-print-graphicsbw queue.
Things to note:
- Large, complex print jobs will be denied from bc-print-bw queue.
- If your job is denied, a notification will immediately be sent to your BC email account.
- All jobs can be retrieved from any printer, regardless of which queue they were submitted to.
Having trouble with PaperCut?
Certain Chromebooks and laptops (such as Microsoft Surface laptops) may not work with PaperCut. If so, you will need to print PDFs via bcprint.bc.edu:
To print PDFs via bcprint.bc.edu:
- Go to bcprint.bc.edu and log in with your BC credentials.
- On the left menu, click Web Print.
- Click Submit a Job and follow the prompts to upload a PDF and print.
Student Printing FAQ
No. At the print release station, you can enter your BC username & password to print. You can also swipe your BC ID to print.
Once you have used up your semester's allotment of $15 in PrintBucks, you will be charged to your Eagle Bucks account if you need to print additional pages. Additional black and white pages are 3 cents per page and 50 cents for each additional color page.
To add money to your Eagle Bucks account, log in to Agora Portal. Under the Account and Personal Info section, click Eagle One Card — Add Funds. Click Add Funds, then add Eagle Bucks.
All students are allotted $15 in PrintBucks each semester (full-time, part-time, undergraduate, graduate, international, etc.).
No. To print materials for your club's activities, we suggest you use on-campus, professional print services from Eagle Print.
No. To print materials for your faculty employer, we recommend you print using a faculty or department printer.
No. You are given $15 in PrintBucks to cover both summer sessions.
View your print activity in your Eagle One Card Activity Summary in Agora Portal.
No, your PrintBucks are reset to $15 at the beginning of each semester.
Two pages, printed double-sided, are charged as one page.
Note: The default setting on the Library computers are set to print double-sided. If you want to print single-sided, you will need to change the default setting.
That depends on if you have enough money on your Eagle Bucks account to cover the remaining pages over your $15 in PrintBucks allotment:
- If you go over your $15 in PrintBucks allotment and you have enough money on your Eagle Bucks account, the over-quota pages are simply charged to your Eagle Bucks at 3 cents per page (sent to the Black and White print queue), or 50 cents per page (sent to the Color print queue).
- If you go over your $15 in PrintBucks allotment and you don't have enough money on your Eagle Bucks account, your print job won't print. You will need to add money to your Eagle Bucks in order to print more pages. Note: To add money to your Eagle Bucks account, log in to Agora Portal. Under the Account and Personal Info section, click Eagle One Card — Add Funds. Click Add Funds, then add Eagle Bucks.
For questions about the printing policy, please contact Student Services in Lyons Hall at (617) 552-3300.
PaperCut Printer Locations
- 2000 & 2150 Commonwealth Ave (residence halls) - access is restricted to residence only
- Alumni Hall
- Bapst Library
- Corcoran Commons (2nd level)
- Educational Resource Center (ERC), Campion Hall G13
- Graduate Computer Lab, Fulton 260
- Keyes South basement (Newton Campus)
- Law School Library
- Maloney Hall (Nursing student lounge)
- McElroy, Eagle's Nest (2nd floor dining hall)
- Messina College (Ashby)
- Murray House (Graduate Student Center)
- O'Connell House
- O'Neill 205 (Digital Studio)
- O'Neill Library (1st, 2nd, 3rd & 5th floors)
- Social Work Library, McGuinn B38
- Student-Athlete Academic Services (SAAS)
- Theology and Ministry Library
- Trinity Chapel (Newton Campus)
Looking for color printers?
There are two color printers: O'Neill 205 (Digital Studio) & O'Neill Library 3rd floor
If you need to print a large document in color, you may want to consult with other print service providers. On-campus, professional print services are available from Eagle Print.
Setting up PaperCut
Setting up PaperCut on Mac
PaperCut supports macOS Sierra (v. 10.12) & higher.
- Make sure you are connected to BC WiFi. If you are off-campus, you need to connect to VPN too.
- From the Apple menu, click System Preferences, then click Printers & Scanners.
- Click + to add a printer.
- Select one of the BC print queues: "bc-print-bw" or "bc-print-color" or "bc-print-graphicsbw"
Printing complex or large files (Google Slides, PowerPoint, complex PDFs, etc.)? Send your job to the "bc-print-graphicsbw" queue, and retrieve it from any printer as usual.
- Make sure that Use is set to AirPrint or Secure AirPrint, then click Add.
Note: If you do not see AirPrint or Secure AirPrint, then disconnect from the WiFi & reconnect again (for wired: unplug the Ethernet cord & plug it back in again).
- To add the other BC print queue, repeat steps 1-6.
- You can now print to the BC print queues by selecting "bc-print-bw" or "bc-print-color" or "bc-print-graphicsbw" from your list of printers. Note: It may take up to 5 minutes for your job to enter the queue when printing Google Slides, PowerPoint, and complex PDFs.
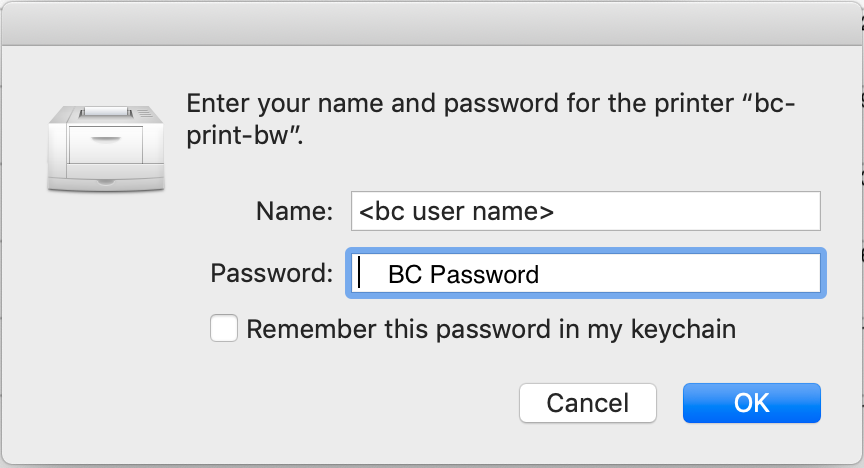
- When prompted, enter your BC username and password (same as used for Agora Portal). Note: Your Mac's local account username will be prepopulated in the Name box. Delete this and enter your BC username:

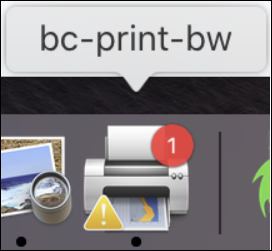
Note: If you see the printer icon in your Dock with a yellow warning and a red number notification, click to open it. If you see a "Hold for Authentication" message (see Figure 1 in Troubleshooting Common Issues), you may have entered your BC username or BC password incorrectly. Click the refresh icon to enter your BC username & BC password again (same as used for Agora Portal).
Setting up PaperCut on Windows
PaperCut supports Microsoft Windows 10+.
- Make sure you are connected to BC WiFi. If you are off-campus, you need to connect to VPN too.
- Download PaperCut for Windows software directly from PaperCut.
- Save the file to your Desktop.
- Double-click the file and follow the on screen instructions.
- When prompted, select one of the BC print queues: "bc-print-bw" or "bc-print-color" or "bc-print-graphicsbw." Printing complex or large files (Google Slides, PowerPoint, complex PDFs, etc.)? Send your job to the "bc-print-graphicsbw" queue, and retrieve it from any printer as usual.
- When prompted, enter your BC username and password (same as used for Agora Portal).
- Once installation is complete, you can print to the BC print queues by selecting "bc-print-bw" or "bc-print-color" or "bc-print-graphicsbw" from your list of printers. Note: It may take up to 5 minutes for your job to enter the queue when printing Google Slides, PowerPoint, and complex PDFs.
* If you have issues with this button, try using a browser other than Chrome to open this download link: https://papercut.com/products/ng/mobility-print/download/client/windows/ - OR - Use the Mobility Print installer download link on PaperCut's help page.
Setting up PaperCut on iOS (iPhone & iPad)
PaperCut supports iOS 9.2+.
- Make sure you are connected to BC WiFi. If you are off-campus, you need to connect to VPN too.
- Print your document as described in the Apple how-to document:
- Select one of the BC print queues: "bc-print-bw" or "bc-print-color" or "bc-print-graphicsbw"
Printing complex or large files (Google Slides, PowerPoint, complex PDFs, etc.)? Send your job to the "bc-print-graphicsbw" queue, and retrieve it from any printer as usual.
- When prompted, enter your BC username and password (same as used for Agora Portal).
- Note: It may take up to 5 minutes for your job to enter the queue when printing Google Slides, PowerPoint, and complex PDFs.
Setting up PaperCut on Android
PaperCut supports Android 4.4+.
- Make sure you are connected to BC WiFi. If you are off-campus, you need to connect to VPN too.
- Go to the Google Play Store & install the PaperCut Mobility Print Android app.
- Launch the app.
- Tap Android settings.
- Tap Mobility Print.
- Tap the enable toggle.
- Exit out of Settings.
- Print your document. Note: The way you print is different depending on the app you want to print from. For more information, see the app documentation.
- Select one of the BC print queues: "bc-print-bw" or "bc-print-color" or "bc-print-graphicsbw"
Printing complex or large files (Google Slides, PowerPoint, complex PDFs, etc.)? Send your job to the "bc-print-graphicsbw" queue, and retrieve it from any printer as usual. - When prompted, enter your BC username and password (same as used for Agora Portal).
- Note: It may take up to 5 minutes for your job to enter the queue when printing Google Slides, PowerPoint, and complex PDFs.
- Select one of the BC print queues: "bc-print-bw" or "bc-print-color" or "bc-print-graphicsbw"
Setting up PaperCut on Chrome OS
PaperCut supports Chrome OS with Chrome version 43+ for Chrome apps and version 53+ for Android apps.
- Make sure you are connected to BC WiFi. If you are off-campus, you need to connect to VPN too.
- Go to the Google Play Store & install the PaperCut Mobility Print Chrome app:
If you want to print from Android applications such as Microsoft Word:
- Enable Google Play store as a user or as an Administrator.
- Go to the Google Play Store & install the PaperCut Mobility Print Android app:
- Click Open.
- Click Android settings.
- Click Mobility Print.
- Click the enable toggle.
Note: Android apps are available only on supported devices. To see if your Chromebook supports Android app printing, see Chrome OS Systems Supporting Android Apps:
Your Chromebook must run Chrome OS version 53+.
To see if your apps are Android apps:
- Open the Play Store app.
- Click the
 menu; then select My Apps and Games.
 - Click the Installed tab. A list of the Android apps installed on your Chromebook is displayed.
To print your document:
Note: The way you print is different depending on the app you want to print from. For more information, see the app documentation.
- Select one of the BC print queues: "bc-print-bw" or "bc-print-color" or "bc-print-graphicsbw"
Printing complex or large files (Google Slides, PowerPoint, complex PDFs, etc.)? Send your job to the "bc-print-graphicsbw" queue, and retrieve it from any printer as usual. - When prompted, enter your BC username and password (same as used for Agora Portal).
- Note: It may take up to 5 minutes for your job to enter the queue when printing Google Slides, PowerPoint, and complex PDFs.
Retrieving Print Jobs
To retrieve your print job, go to a PaperCut printer location. At the print release station, either swipe your BC ID or enter your BC username & password (same as used for Agora Portal).
- Two pages, printed double-sided, are charged as one page.
- Your print jobs remain in the queue for 24 hours.
- Mac Note: If you see the printer icon on your device is flashing or in your Dock with a yellow warning and a red number notification, click to open it. If you see a "Hold for Authentication" message (see Figure 1 in Troubleshooting Common Issues), you may have entered your BC username or BC password incorrectly. Click the refresh icon to enter your BC username & BC password again (same as used for Agora Portal).
Printing complex or large files (Google Slides, PowerPoint, complex PDFs, etc.)?
- Send your job to the "bc-print-graphicsbw" queue, and retrieve it from any printer as usual.
- It may take up to 5 minutes for your job to enter the queue.
- PowerPoint has an option to print six slides per page. When printed double-sided, you can print twelve slides on one sheet.
Color printing
- Color printing costs 50 cents per page (deducted from your PrintBucks account).
- There are only two color printers on campus [O'Neill 205 (Digital Studio) & O'Neill Library 3rd floor].
- Color printers are configured for single-sided printing only.
- If you need to print a large document in color, you may want to consult with other print service providers. On-campus, professional print services are available from Eagle Print.
Troubleshooting Common Issues
Or you see the printer icon in your Dock with a yellow warning and/or a red number notification  - click to open it. If you see the "Hold for Authentication" error message (see Figure 1), you may have entered your BC username or BC password incorrectly. Click the refresh icon on the error message (see red circle) to enter your BC username & BC password again (same as used for Agora Portal) (see Figure 2).

Figure 1: Click the refresh icon on the "Hold for Authentication" prompt.

Figure 2: Enter your BC username and BC password (same as used for Agora Portal).
You may have saved your credentials (possibly incorrectly).
- Use Spotlight to find KeyChain Access: Click the magnifying glass icon in the upper-right corner of your screen & type Keychain Access.
- Find the saved password for the bc-print-bw, bc-print-graphicsbw, or bc-print-color queue & right-click (or Ctrl-click) to delete it.
Check your BC email to see if you have received this job denied message & follow the instructions in the email to fix the issue.
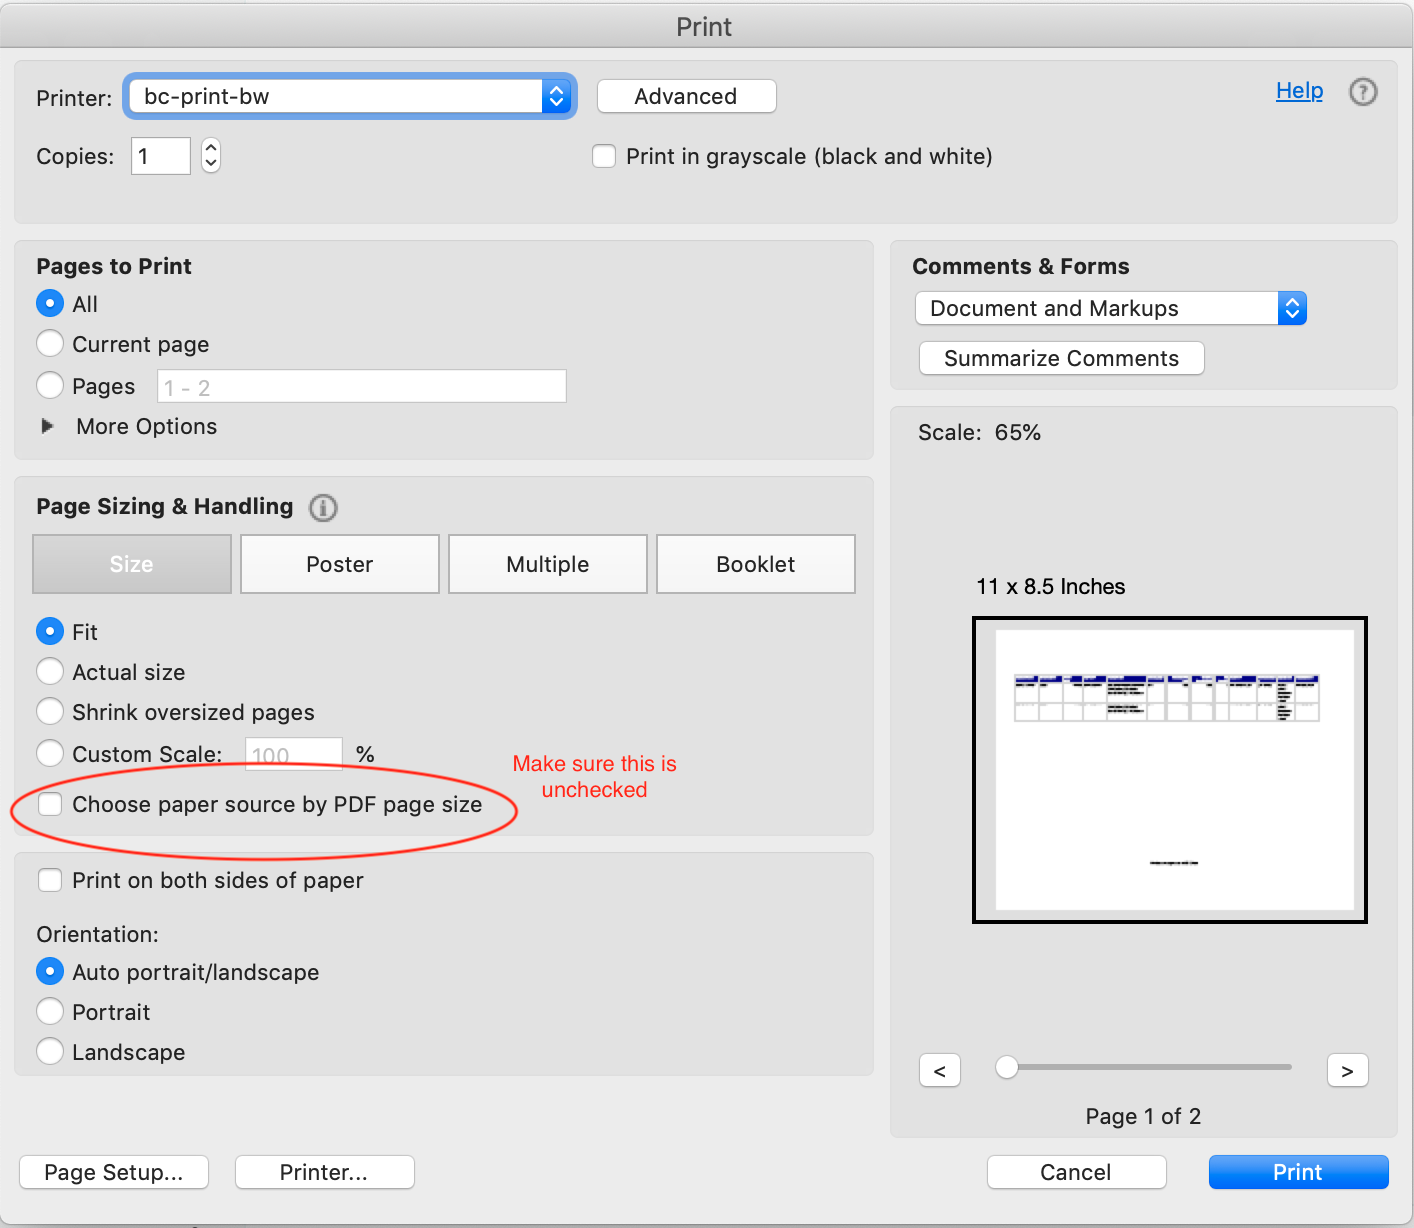
Using Adobe Reader or Adobe Acrobat? On the Print dialog, make sure to uncheck the "Choose paper source by PDF page size" box (see Figure 3):

Figure 3: Uncheck the "Choose paper source by PDF page size" box.
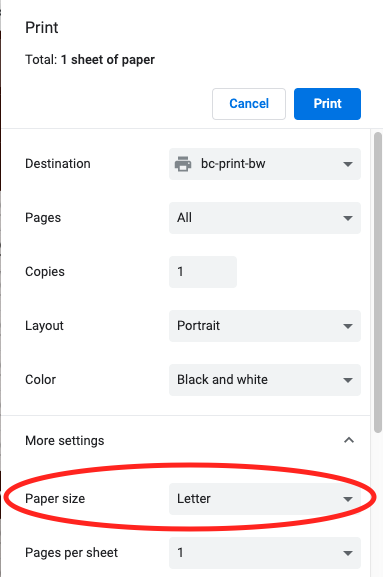
Chrome sets the default paper size to A3, which is not supported. Make sure the paper size is set to letter.
To change the paper size:
- On the Print dialog, select More Settings:

- For Paper size, select Letter:

Chrome will use Letter as the default paper size for the current print queue. You will need to change the default paper size for each print queue.
Having trouble with PaperCut?
Certain Chromebooks and laptops (such as Microsoft Surface laptops) may not work with PaperCut. To work around this, you will need to print PDFs via bcprint.bc.edu:
To print PDFs via bcprint.bc.edu:
- Go to bcprint.bc.edu and log in with your BC credentials.
- On the left menu, click Web Print.
- Click Submit a Job and follow the prompts to upload a PDF and print.
Personal Wireless Printers
Wireless printers are designed to work in home network environments, and therefore won’t work wirelessly on a campus network environment. Please use a USB cable to connect your printer to your computer, instead of wireless.
Adding a Printer from the BC Network using Mac
- To add a printer from the BC network using High Sierra (macOS 10.13 and above):
- Log in to your computer as an Administrator.
- From the Apple menu, select System Preferences.
- Double-click the Printers & Scanners icon.
- Underneath the list of available printers already on your Mac, click the plus (+) sign.
- To add a printer using IP (Internet Protocol):
- On the top menu bar, select IP.
- From the Protocol drop-down list, select Line Printer Daemon - LPD.
- In the Address box, enter the printer name followed by ".bc.edu"
Note: The printer name should be on the front of the printer. If it is not, contact your Technology Consultant (TC). - In the Name box, enter a descriptive name for the printer (for example, Color Laser Printer), so you can identify it in the Printer pop-up menu.
- From the Use drop-down list, select a printer model or it will auto select for you.
- Select a model name from the models listed and click OK.
- Click Add.
- Select your printer's options from the list, then click OK.
- The Printer List window appears with all the names of the printers you added. Your default printer is listed in bold text.
- To change your default printer, select the printer you want from your Default printer drop-down list.
Adding a Printer from the BC Network using Windows 11
- In the Search, type "printers" and then click Printers & scanners.
- Click Add device.
- Scroll down and next to The printer that I want isn't listed, click Add manually.
Note: If asked if you want to allow this app to make changes, click Yes.
- Select Add a printer using an IP address or hostname, then click Next.
- In the Hostname or IP address box, enter the printer name followed by ".bc.edu", then click Next.
Note: If asked about additional port information, leave the default selection and click Next. - Select the type of printer you are using, then click Next.
Note: If asked about which version of the driver to use, leave the recommended selection and click Next. - On the "Type a printer name window," do the following:
- In the Printer name box, enter a name for your printer so you can identify it.
- If you want to make this printer your default printer, check Set as the default printer.
- Click Next.
- On the Printer Sharing window, select Do not share this printer and click Next.
- On the "You've successfully added" window, do the following:
- Click Print a test page.
Note: If the test page did not print correctly, call your TC. - When you have successfully printed a test page, click Finish.
- Click Print a test page.

